A catalogue image that cannot keep pace with product variations creates friction across every launch. With sku product rendering, a single 3D model can support consistent imagery across colourways, angles and campaign formats, without relying on a separate physical shoot for every version.
You need to know how this approach compares with product photography, what files a rendering project can deliver, and which image types suit your catalogue. This guide explains the factors that shape the scope of a project, the role of technical specifications, and how still images, 360° views and lifestyle scenes serve different product needs. The result is a clearer basis for planning visual content that is accurate, cohesive and ready for your digital channels.
Key Takeaways
- Packaging artwork and CAD files can form the basis for consistent catalogue imagery, with colour, texture and size variations prepared for different product versions.
- Compare computer-generated imagery with photography by considering product access, model requirements and how many variations the catalogue needs to represent.
- Set image resolution and file requirements around where each asset will appear, from e-commerce listings to print catalogues.
- Choose between single-product images, 360-degree views and interactive configurators based on how customers need to examine or customise a product.
- See how Line Creative’s product visualisation and CGI services can support clear, cohesive product imagery.
Creating SKU Product Renders for E-commerce Catalogs
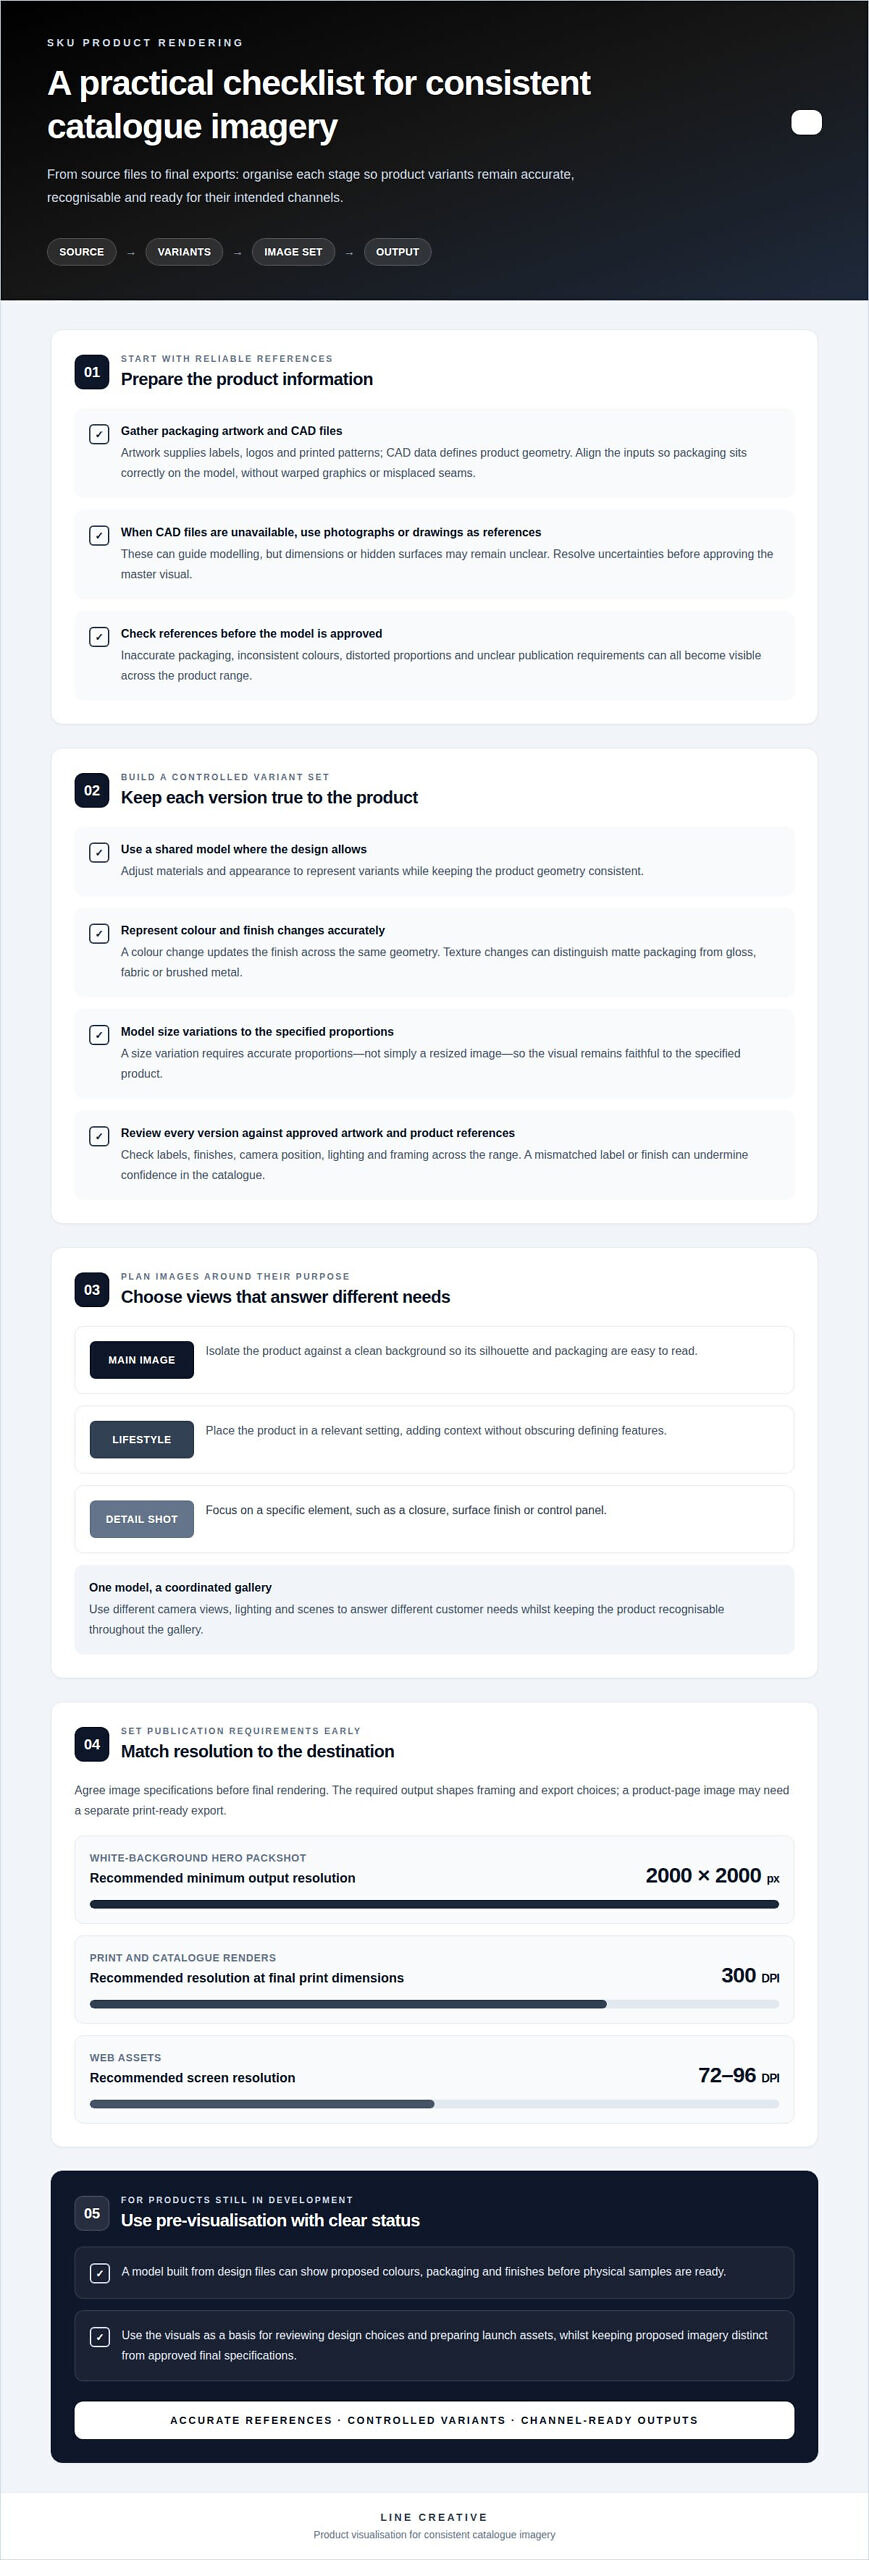
Common risks include inaccurate packaging, inconsistent colours, distorted proportions and images that do not meet publication specifications. These issues often start with incomplete source files or unclear requirements, then become visible across the product range.
Preparing Artwork and CAD Files
Product images can be created from packaging artwork and CAD files, which provide different kinds of information. Artwork supplies graphic elements such as labels, logos and printed patterns; CAD data defines the product’s geometry. The production process aligns these inputs so packaging sits correctly on the model, without warped graphics or misplaced seams.
When CAD files are unavailable, photographs or drawings can guide modelling, although dimensions or hidden surfaces may remain unclear. Resolve uncertainties before approving the master visual.
Changing Colours, Textures and Sizes
Once the model is established, its materials and appearance can be adjusted to represent product variants. A colour change can update the finish across the same geometry; a texture change can distinguish matte packaging from gloss, fabric or brushed metal. Size variations require accurate proportions, not simply a resized image, so the result remains faithful to the specified product.
For brands with several variants, use a shared model and controlled material changes where the design allows. This helps keep camera position, lighting and framing consistent across images. Review each variation against approved artwork and product references, since a mismatched label or finish can undermine confidence in the whole catalogue.
Creating Main, Lifestyle and Detail Images
Plan each image around its purpose. A main image isolates the product against a clean background, making its silhouette and packaging easy to read. Lifestyle scenes place it in a relevant setting, adding context without obscuring defining features. Detail shots focus on specific elements, such as a closure, surface finish or control panel.
A coordinated set can use one model for different views, with changes to the camera, lighting and scene. This keeps the product recognisable throughout the gallery while allowing each image to answer a different customer need.
Publication specifications should be set before final rendering. A white-background hero packshot has a recommended minimum output resolution of 2000×2000 px. For print and catalogue renders, the recommended resolution is 300 DPI at final print dimensions; web assets have a recommended screen resolution of 72-96 DPI. These requirements shape framing and output, so an image prepared for a product page may need a separate print-ready export.
Pre-visualisation can also support products still in development. A model built from design files can show proposed colours, packaging and finishes before physical samples are ready. This gives teams a visual basis for reviewing design choices and preparing launch assets, while keeping proposed imagery distinct from approved final specifications.
3D Rendering Compared with Product Photography
Photography captures a physical product through a camera, while 3D rendering builds its appearance digitally. The right approach depends on product access, source references and the range of images your commerce catalogue requires.
Modelling from Product References
Product modelling creates the digital form used to produce rendered images. CAD files can provide geometry; photographs and drawings can guide modelling when CAD data is unavailable. Each source has a different role: a CAD model may describe dimensions, while a photograph shows visible surfaces and a drawing can clarify a specific profile.
The production team assesses the references, resolves inconsistencies and builds a model to match the intended product. For example, photographs of a bottle can show its finish and label, while a drawing can clarify the shape of its cap. Accurate references matter because model errors carry through every camera angle and scene.
Creating Photorealistic Product Renders
After modelling, the rendering process defines materials, lighting, camera position and background. The team can then create a clean studio image or a considered lifestyle scene without arranging a physical product shoot. Photorealistic product rendering depends on how well the digital surface responds to light, particularly on reflective glass, soft fabric or polished metal.
Product photography remains useful when the actual object needs to be captured directly, including details that are difficult to reproduce from incomplete references. Rendering offers control over the camera, lighting and scene, while a shared model can produce consistent views of product variations. Neither method removes the need for accurate product information.
For a catalogue with several finishes, a digital model can keep framing and lighting consistent as materials change. A photography session may instead require each physical variation to be available and prepared for its setup. The right approach depends on whether you need direct capture, repeatable visual control or both across your product range.
Rendering separates modelling from image production. Once a model is ready, the team can create different camera views or settings without rebuilding the object for each image. This is useful when products need both studio and contextual scenes. Photography records each setup through the camera, so changes to the physical arrangement may require another capture.
Compare the required output, not just the production method. A single hero image of an available product may suit photography; a product in development or a range of visual variants may call for modelling and rendering. For either approach, clear references and agreed image specifications help keep the final assets aligned with the product and catalogue.
Product Render Deliverables and File Formats
Define the required formats, destinations and review stages before rendering begins. These decisions shape how each asset is prepared and delivered for your catalogue.
Choosing Render Deliverables and File Formats
Specify the image format according to its intended use. JPEG exports are recommended at 85-95% quality when used for web product images; transparent backgrounds may call for a format that supports transparency. For web augmented reality, GLB files are recommended under 15 MB, while USDZ files are recommended under 20 MB for iOS Quick Look.
A delivery brief should also specify image dimensions, naming conventions and required views. For example, a product-page gallery might need a main image, a detail view and a lifestyle scene. Clear specifications help the rendering team produce assets that fit the marketing workflow without extra conversion.
Rendering typically involves model preparation, material and lighting setup, camera composition, review and final export. The client reviews preview images at agreed stages, allowing composition or material adjustments before final rendering. This gives the team a controlled opportunity to resolve visual issues before delivering the approved gallery.
Delivery time depends on the number of products, model complexity, scene requirements and revision rounds. A project covering 29 products across five markets was delivered in three weeks. Simple product silo renders can typically be delivered within a few days, while the schedule for a larger catalogue needs to account for modelling and review work.
Arranging Batch Rendering and Delivery
For a batch of five to ten products, typical delivery takes five to seven business days, depending on complexity and revision rounds. Grouping products by shared camera angles, materials or scene requirements helps maintain a consistent visual treatment across the catalogue. The production schedule should also allow for product-specific details that need separate modelling or review.
Gallery delivery should organise final files so each image clearly maps to its product and view. For example, a structured naming pattern can distinguish a main image from a detail shot or a market-specific label. A final review checks the files against the agreed format, dimensions and product references.
Processing time can also vary by output type. A 3D Cloud spin render can take up to 19 hours to generate, depending on model complexity. This processing stage sits within the broader production schedule, so interactive or high-volume deliverables need to be planned alongside still images.
Single Product and Configurator Render Types
Choose still renders for focused product presentation, or interactive assets when customers need to explore variations.
Rendering by SKU requires the product’s dimensions, materials, colour options, reference imagery and details that distinguish each version. Accuracy depends on the quality and completeness of those references and the underlying model.
Rendering by SKU
A SKU product rendering workflow links each product identifier to the correct model, materials and visual variations. A shared model can support catalogue imagery for hundreds or thousands of SKUs when products share geometry and differ through controlled options.
For example, one model can generate 24 images for eight colourways across three camera angles. This supports consistent backgrounds and composition, while keeping custom options distinct. Significant shape changes may require model adjustments rather than a material change alone.
Using SKU Data for Product Renders
Useful inputs include SKU identifiers, product dimensions, finish and colour details, packaging references, and images or CAD files showing the product. These details link each product version to its visual attributes. For example, they distinguish a dark metal finish from a light one without changing the product’s proportions.
How accurate are product renders generated from SKU data? Accuracy depends on how closely the model and assigned materials match the real product. Missing dimensions or unclear surface references can affect scale, shape or finish. SKU records organise variants, but technical references are still essential to represent them faithfully.
A single-product render suits a product page needing a clear hero image, detail view or lifestyle scene. A 360° spin presents the product from multiple angles. In this workflow, the camera can rotate around the model in 12° increments, creating a sequence viewers can inspect interactively.
Configurators let customers select product options and view the corresponding appearance. In SKU product rendering, each selectable attribute, such as colour or finish, must map to the correct model material or variant. A virtual showroom can place products in a navigable digital setting, while an interactive 3D configurator lets viewers rotate and customise a product. Accurate mapping ensures displayed combinations represent the intended product.
Line Creative: Product Visualisation
Line Creative provides product visualisation for brands that need clear, consistent imagery across e-commerce catalogues and marketing channels. Its 3D Rendering service can turn product designs into finished visual assets, supporting projects that need a controlled image style across multiple product versions.
Product visualisation is useful when you need to communicate a product before a physical sample is ready, or when catalogue imagery must represent several finishes and configurations. The work focuses on the product’s appearance: its form, materials, colour, lighting and setting. A carefully planned visual can help customers understand its defining features while keeping the presentation aligned with your brand.
For SKU product rendering, consistency matters as much as the quality of each image. Coordinated camera angles, lighting and composition help related items sit naturally together in a catalogue and make differences between variants easier to see. Clear source material and agreed technical specifications provide a defined basis for the process, from the first model to the final images.
Some campaigns need more than static product images. CGI Animation can present a product in motion, showing details or features from changing viewpoints. This extends the visual material for advertising and digital channels while keeping the product at the centre of the communication. The right format depends on what the audience needs to see and how the asset will be used.
Line Creative also provides architectural visualisation, connecting product-focused imagery with the wider built environment where relevant. For example, a product intended for an interior can be shown in a visual context that communicates scale, material relationships and atmosphere. Product and architectural visuals serve different purposes, but both rely on considered composition and accurate visual communication.
Starting a project means defining the intended audience, image use and product details that must remain accurate. Reference images, packaging artwork or design files can help establish the visual direction. The scope can then be shaped around the required assets, whether you need product stills, CGI Animation or a combination of visual formats.
For a considered discussion of your product imagery requirements, contact Line Creative.
Frequently Asked Questions
What does SKU product rendering mean?
SKU product rendering creates imagery organised around stock keeping units, or SKUs, which identify individual product versions. A SKU might correspond to a particular colour, size or material finish. For example, a retailer could use distinct visual assets for a black lamp and its brass-coloured version. This structure helps catalogue teams match each image to the correct product listing and avoid confusion when publishing similar variants.
How does SKU-based product rendering work?
A rendering team maps each SKU to the correct product model and visual attributes, then produces the required images for those versions. For example, a chair range might offer different upholstery options, with each identifier linked to the correct fabric and product details. The workflow also defines how files correspond to listings, helping teams avoid assigning one variant’s image to another product page.
Which software and platforms do professional SKU product rendering providers use?
Providers use 3D modelling and rendering software to create product assets, with platforms selected according to the required output. Interactive or real-time work may use a game engine; Line Creative offers real-time rendering with Unreal Engine. The relevant choice depends on whether the deliverable is a still image, animation or interactive visual. The platform supports production, but accuracy still depends on product references and model quality.
What is the typical turnaround time for SKU product renders?
Timing depends on product complexity, batch size and review requirements. Simple silo renders can typically be delivered within a few days. Batches of five to ten products typically take five to seven business days, depending on complexity and revision rounds. A large catalogue with custom scenes or extensive modelling needs a schedule that allows time for production, feedback and final file processing.
What steps do professionals follow to create product renders for a large SKU catalogue?
Professionals first organise the SKU list and map each identifier to its product references and variant data. They then prepare models, assign materials and define the required views and outputs. A representative product can establish the visual treatment before production expands across related items. The team checks the assets against the catalogue mapping, then processes and groups approved files for delivery.